


In app development, sometimes we need to run tasks that should not go into the API. Some examples are:
Tasks that take a long time to finish.
Tasks that use a lot of CPU and memory.
Tasks that overloads you database, and need to be scheduled for when people are not using the app. Those kinds of tasks are usually developed as batch jobs.
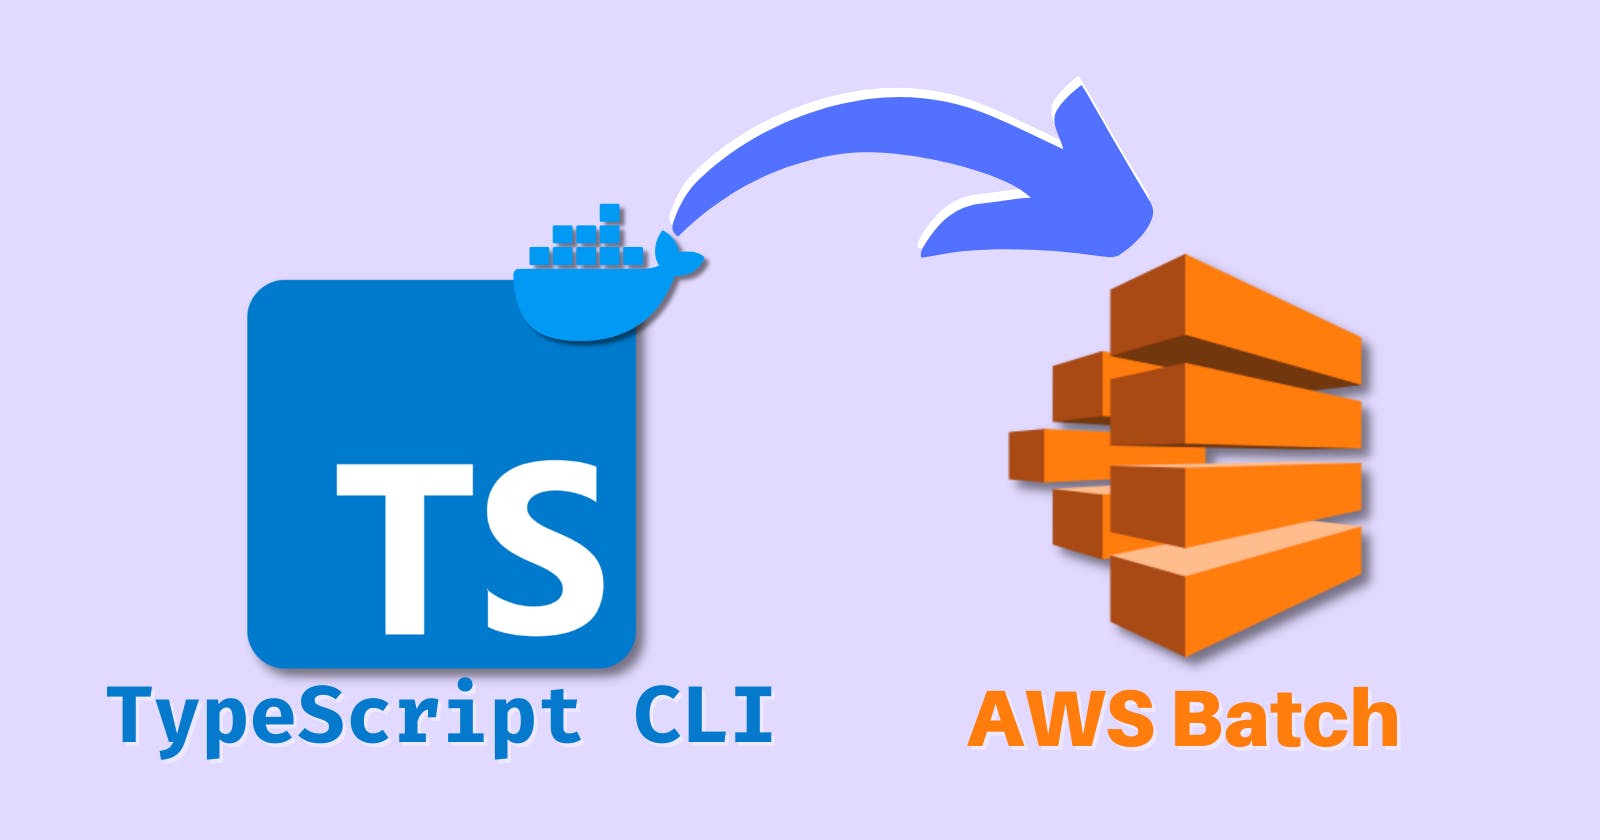
In this tutorial we will learn how to:
💻 Use TypeScript with Commander to create a CLI.
📦 Dockerize the cli.
🌥 Deploy and run it on AWS.
It is possible that TypeScript might not be the best suited language for your use case. But the concepts from this tutorial can be used for deploying batch jobs in other languages as well. You will just need to adapt the first part.
※ Following this tutorial might result in some costs from used AWS Resources. (It should be just a little bit, though)
Requirements
Have node and npm installed.
- Check with
node --versionandnpm --version.
- Check with
Have Docker installed and running.
- Check with
docker versionand make sure both the 'Client' and 'Server' versions are displayed.
- Check with
Have aws-cli installed and configured for your account.
- Check by trying to list you s3 buckets with
aws s3 ls
- Check by trying to list you s3 buckets with
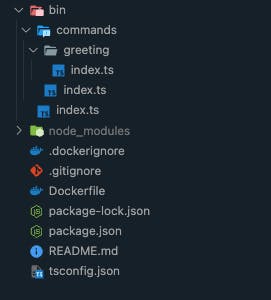
Project structure
To start the project, run the following command from inside the projects empty folder.
npm init -y
This will generate a package.json file with some default values.
After the whole tutorial, our folder structure should look something like this:
Setup TypeScript
First, let's install the necessary packages.
npm i -D typescript ts-node
npm i source-map-support
In the next section, we will register the source-map-support in our main ts file. This will make the error's stacktrace point to the TypeScript file instead of the compiled file.
Now let's make a simple configuration file for TypeScript in the root of the project.
// tsconfig.json
{
  "compilerOptions": {
    "target": "esnext",
    "module": "commonjs",
    "sourceMap": true,
    "lib": ["es2022"],
    "outDir": ".out",
    "rootDir": "bin",
    "strict": true,
    "types": ["node"],
    "esModuleInterop": true,
    "resolveJsonModule": true
  }
}
In the configuration above, we chose to write our TypeScript code inside bin and the compiled code will be outputted to .out. Feel free to change this to what you like.
※ You might want to add the following configuration to your VSCode workspace settings, so that VSCode uses the project's TypeScript version instead of the version bundled with the IDE.
"typescript.tsdk": "node_modules/typescript/lib"
Setup Commander
First, we will install Commander.
npm i commander
Now we will create our first command:
// bin/commands/greeting/index.ts
import { Command } from 'commander';

const folderName = __dirname.split('/').slice(-1)[0];

/**
 * This is an example command
 * that will take your name as an argument
 * and say hello to you in the console.
 */
export default new Command()
  .command(folderName)
  .description('Say hello to you!')
  .argument('<string>', 'Your name')
  .option('-s, --suffix <char>', 'Suffix greetings', ',')
  .action((name: string, options: { suffix: string }) => {
    console.log(`Hello, ${name}! ${options.suffix}`);
  });
Now, we will create a script that exports all commands from inside the commands directory. This will allow us to add new commands just by creating the command file. Without having to add a new export for every command we add.
// bin/commands/index.ts
/* eslint-disable @typescript-eslint/no-var-requires */
import { Command } from 'commander';
import { readdirSync } from 'fs';

const commands: Command[] = [];

readdirSync(__dirname + '/').forEach(function (file) {
  // This will import all files inside the commands directory (except this one)
  if (!file.startsWith('index.')) commands.push(require('./' + file).default);
});

export default commands;
And finally, we will create the main file that will create our cli, and add all commands to it.
// bin/index.ts
#!/usr/bin/env node
import 'source-map-support/register';
import { Command } from 'commander';
import commands from './commands';

const program = new Command();

program.name('cli').description('TypeScript CLI').version('0.0.0');

commands.forEach((cmd) => {
  program.addCommand(cmd);
});

program.parse();
Run the CLI with ts-node
Now we can run our command.
npx ts-node bin/index.ts greeting Ravi -s 'Nice name!'

> Hello, Ravi! Nice name!
We can add this command as a script in our package.json
{
  // ...
  "scripts": {
    "cli": "ts-node bin/index.ts"
  },
  // ...
}
Now we can run the same command with:
npm run cli -- greeting Ravi -s 'Nice name!'
Dockerize
Let's start by creating the Dockerfile.
FROM node:16.16.0-slim

WORKDIR /cli

# Leverage the cached layers to only reinstall packages
# if there are changes to `package.json` or `package-lock.json`
COPY package.json package-lock.json ./
RUN npm ci

# Copy the rest of the files and compile it to javascript
COPY . .
RUN npx tsc \
    && chmod +x .out/index.js

ENTRYPOINT [ ".out/index.js" ]
We want to ignore some files in the COPY command. For this we will create a .dockerignore file.
# .dockerignore
node_modules
.out

Dockerfile
.dockerignore
Now we can build it by running:
docker build -t typescript-cli .

# If you are using a Mac device with an apple chip (M1 or M2), build with the following command:
# This is needed to run on Fargate
docker buildx build --platform=linux/amd64 -t typescript-cli .
And finally we can run the job with:
docker run --rm -it typescript-cli greeting Ravi -s 'Nice name!'

> Hello, Ravi! Nice name!
Push to ECR
First, we need to create the ECR repository.
Go to the ECR Console.
Create a new private repository named
typescript-cli.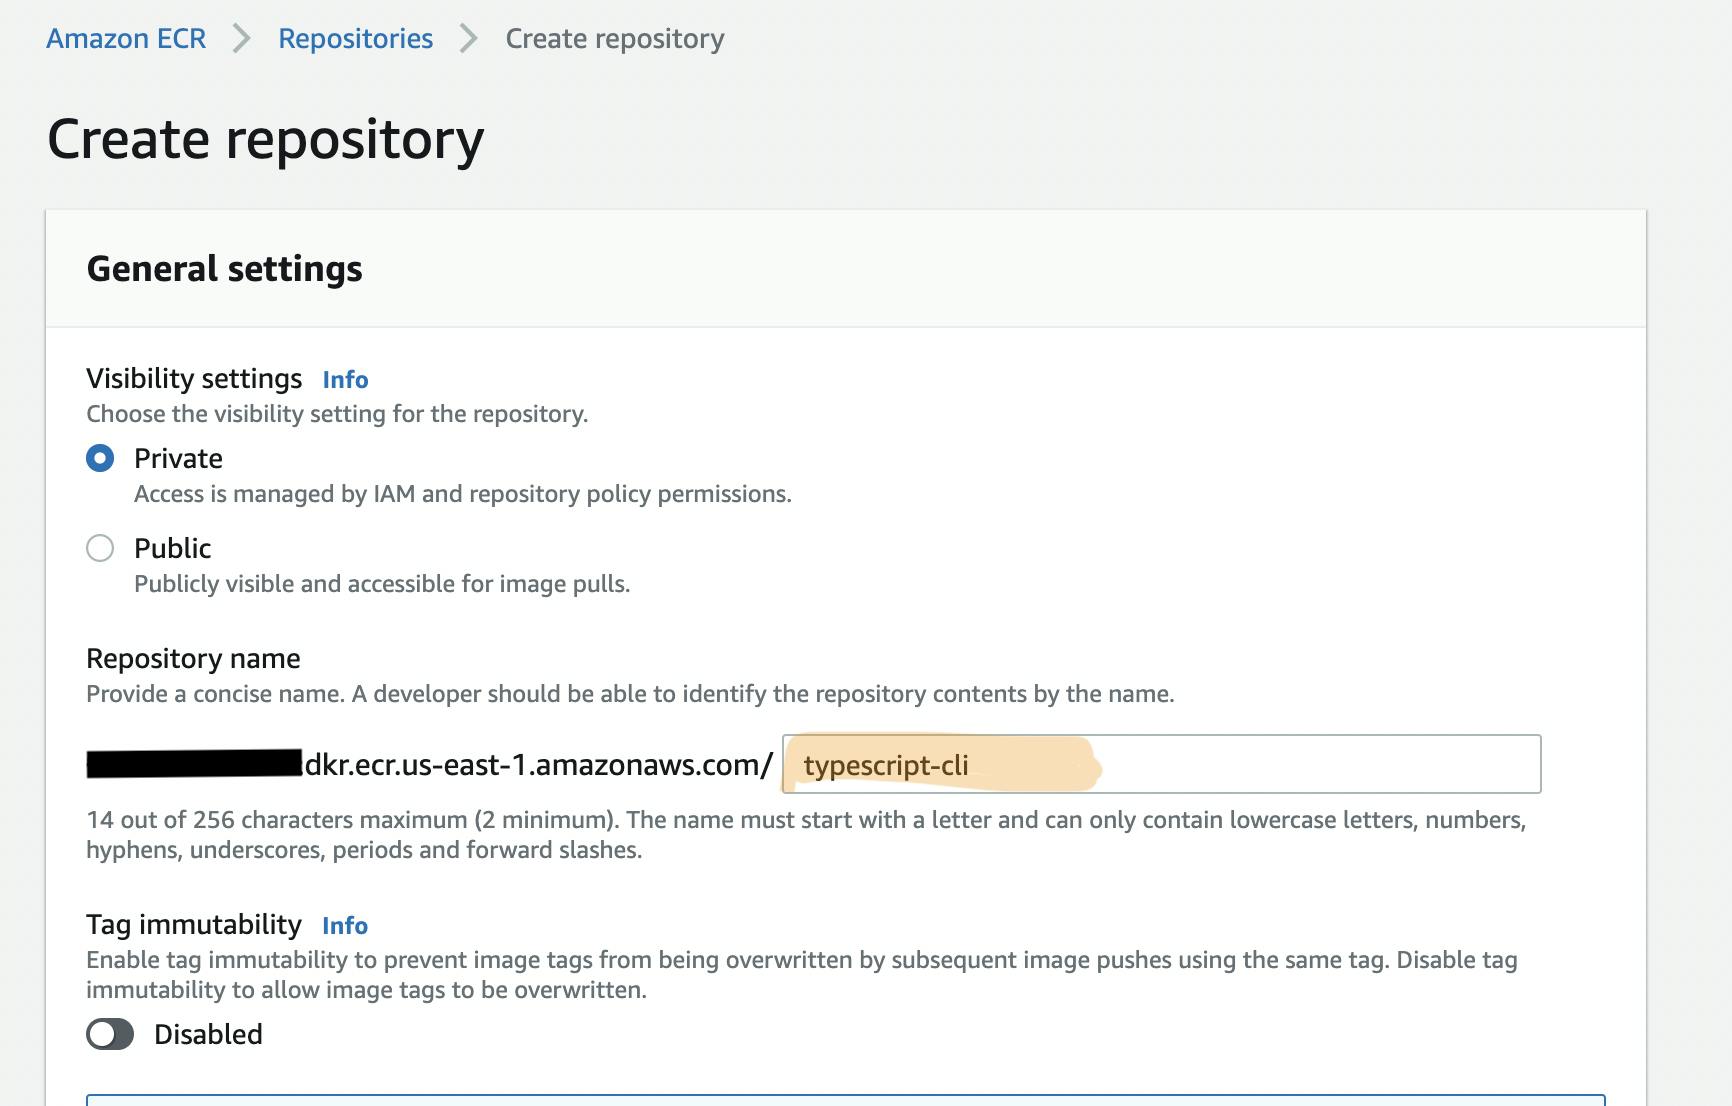
Now, we need to push our local image to the ECR repository.
Login to ECR.
aws ecr get-login-password --region <region> | docker login --username AWS --password-stdin <aws_account_id>.dkr.ecr.<region>.amazonaws.com
※ Replace the <***> with your information.
Tag your image for the ECR repository
docker tag typescript-cli:latest <aws_account_id>.dkr.ecr.<region>.amazonaws.com/typescript-cli:latest
Push your image
docker push <aws_account_id>.dkr.ecr.<region>.amazonaws.com/typescript-cli:latest
Setup AWS Batch
Now, we are ready to setup the job in AWS Batch
Create an Execution Role
For AWS Batch to be able to access the ECS related services, we need to create an IAM Role for it. (We're going to use it when creating the 'Job Definition')
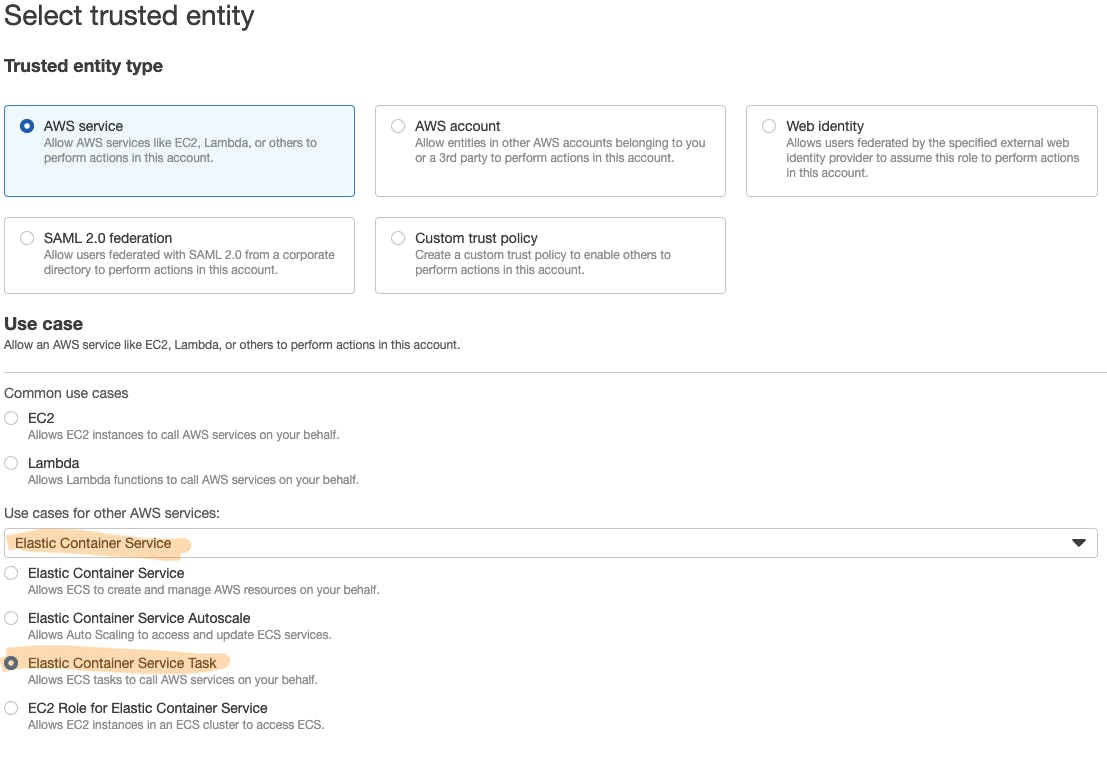
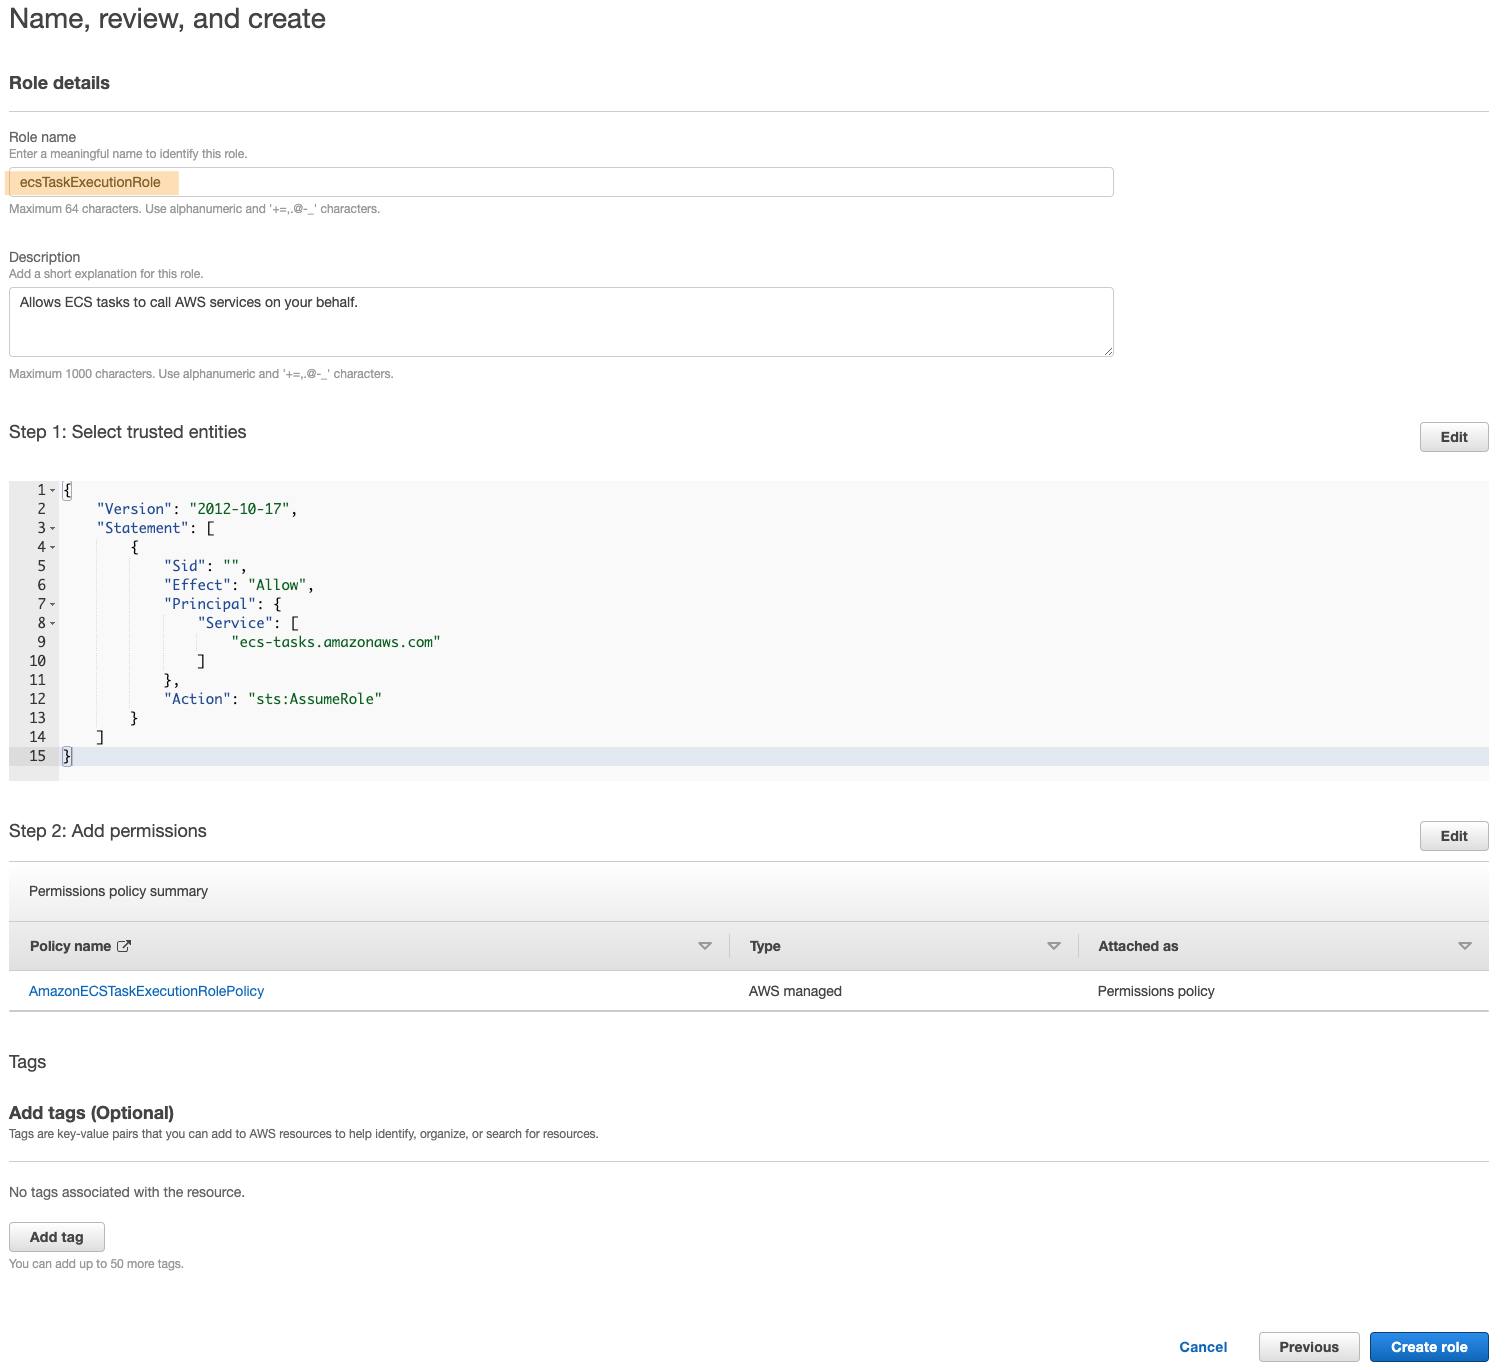
First, let's go to the IAM > Roles console. And click in 'Create role'.

Then, search for the 'Elastic Container Service' and select 'Elastic Container Service Task'.
Next, we need to search for 'ecs' and select 'AmazonECSTaskExecutionRolePolicy'. This will give the necessary permissions to access the ECR image we pushed.
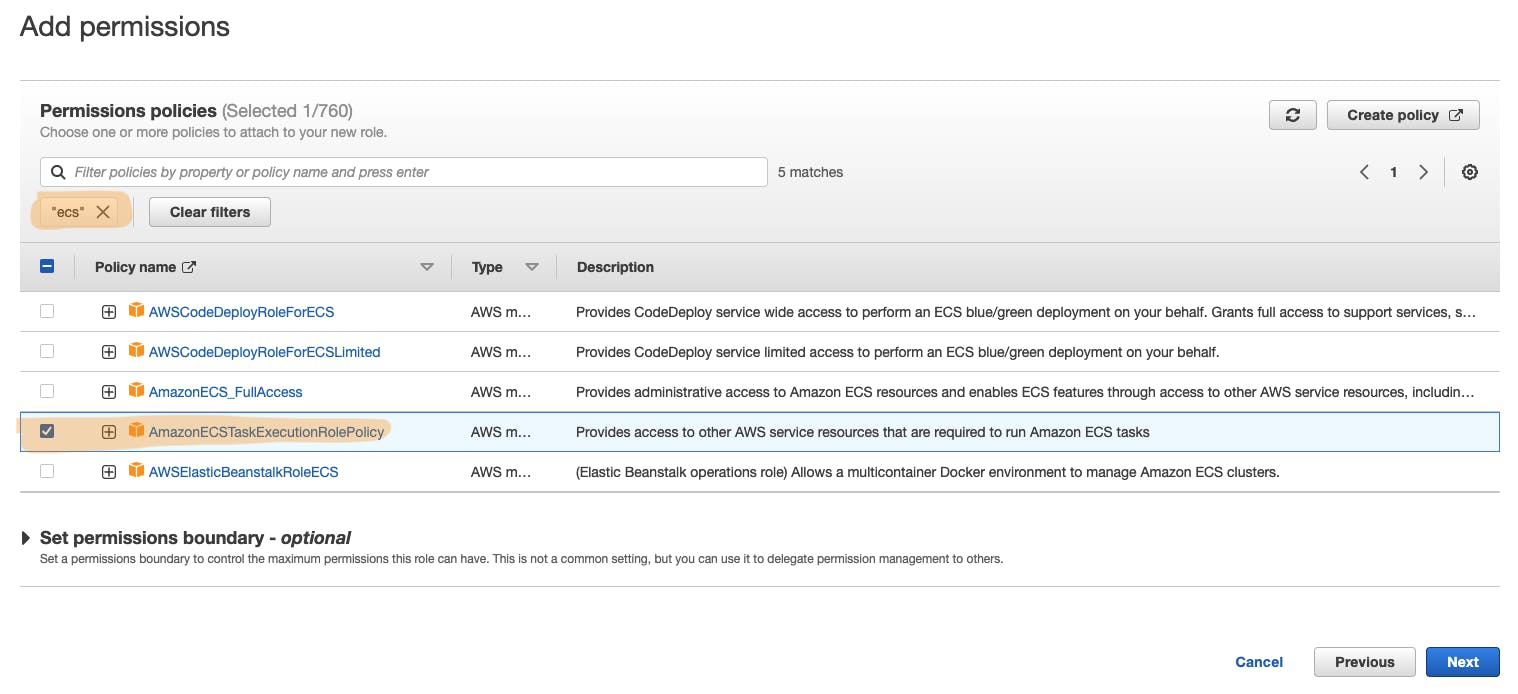
Finally, we just choose a name for the role, and click 'Create role'. Let's name it 'ecsTaskExecutionRole'.
Create a Compute Environment
Let's create a Compute Environment.
For that, we need to go to the Batch console > Compute Environment. And then create a new environment.
The only thing we need to set here is the [Compute environment name]. Let's set it to 'ts-batch'.
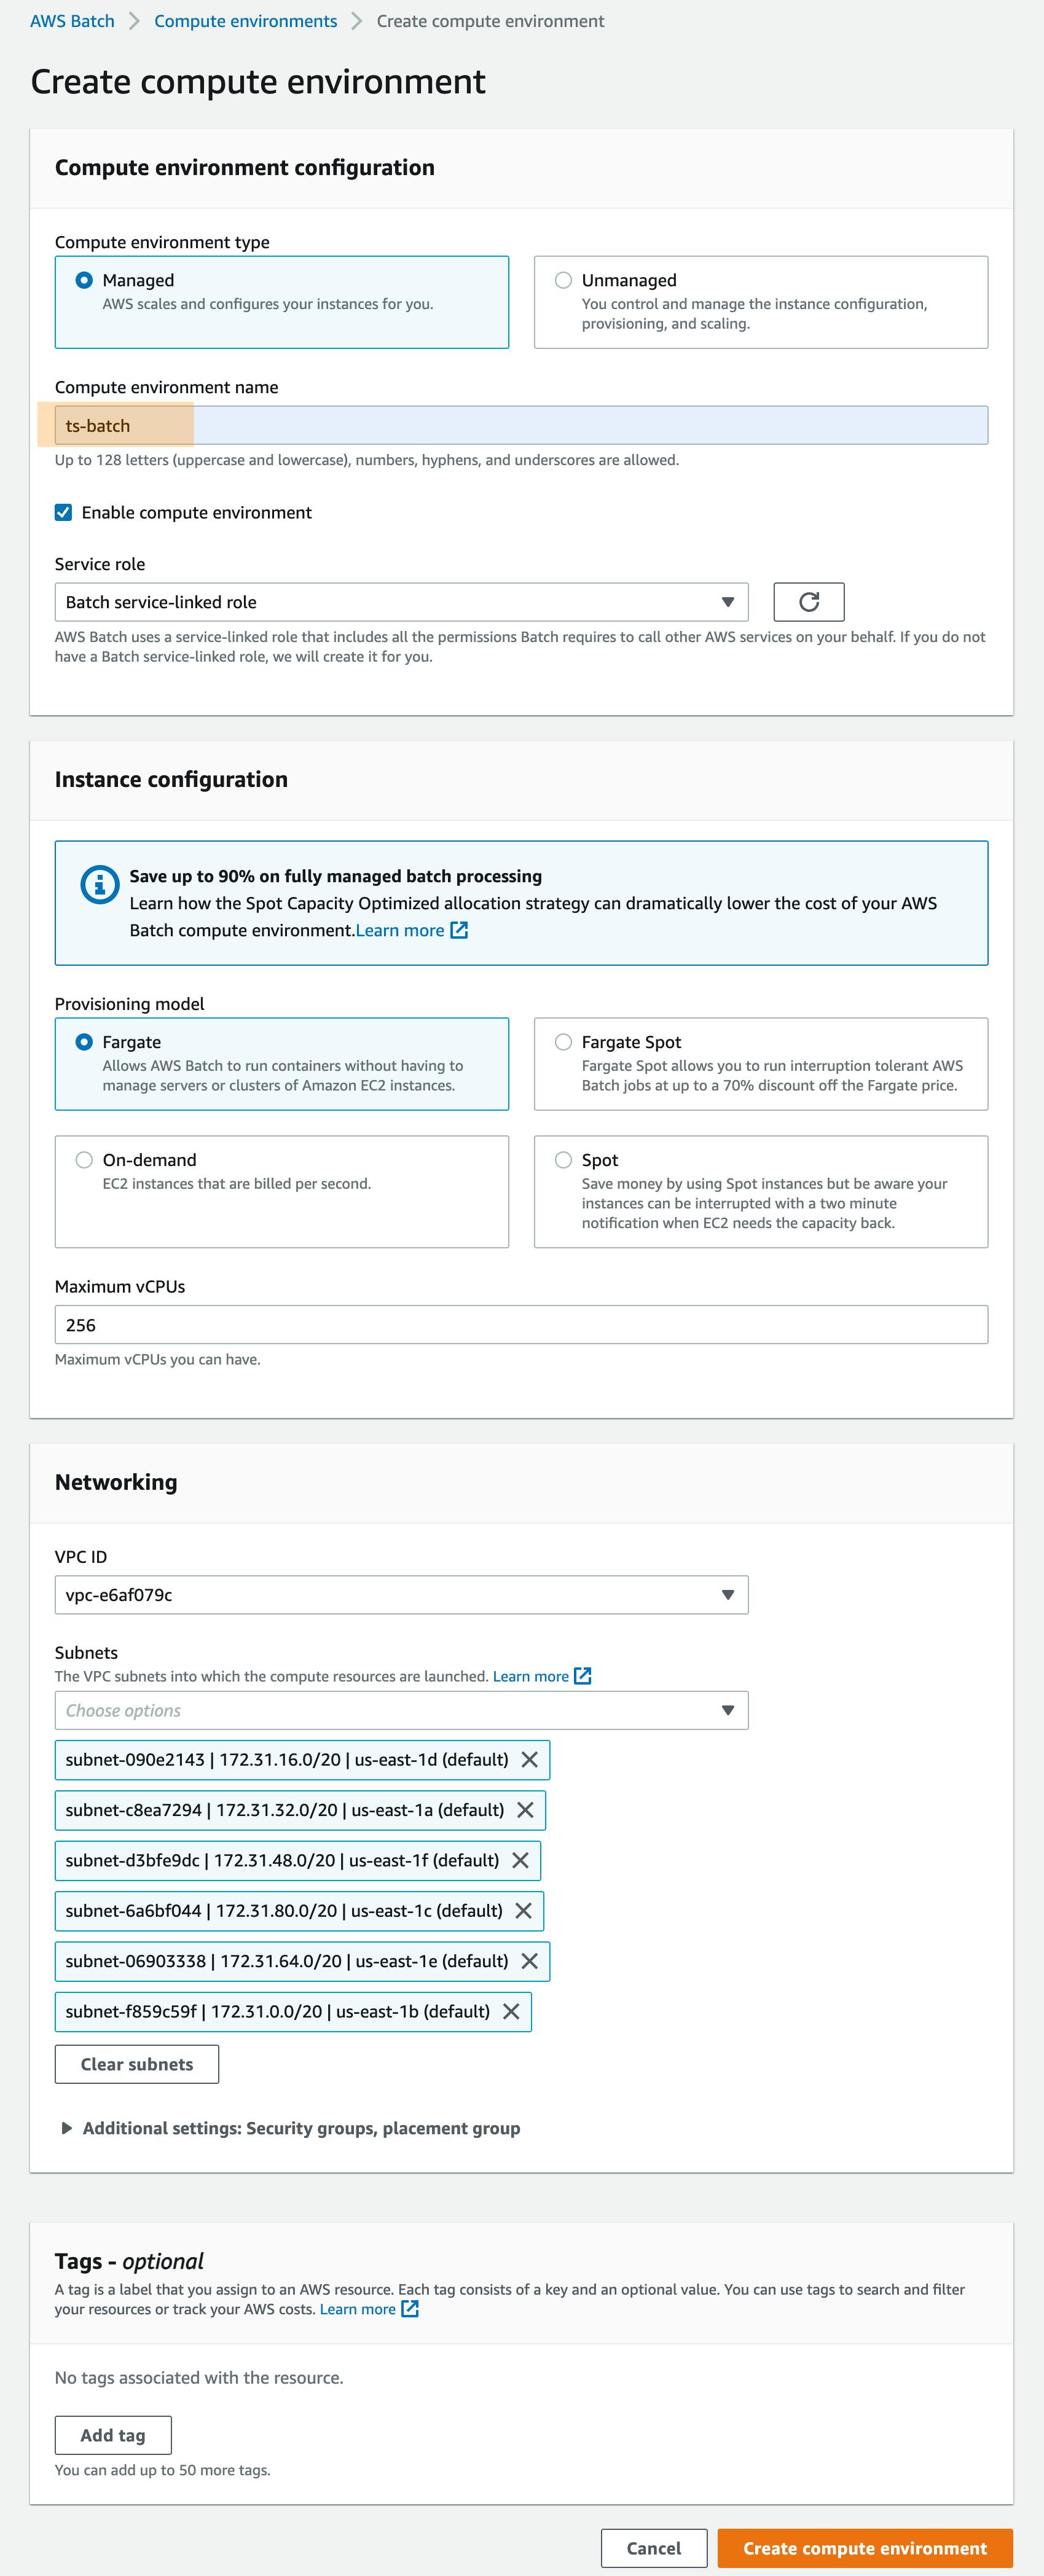
The rest can be kept on the default values.
※ Make sure Fargate is selected on the provisioning model.
※ Usually we want to run the Batch job inside a Private Subnet. But for the demo, just keep the defaults and it should work.
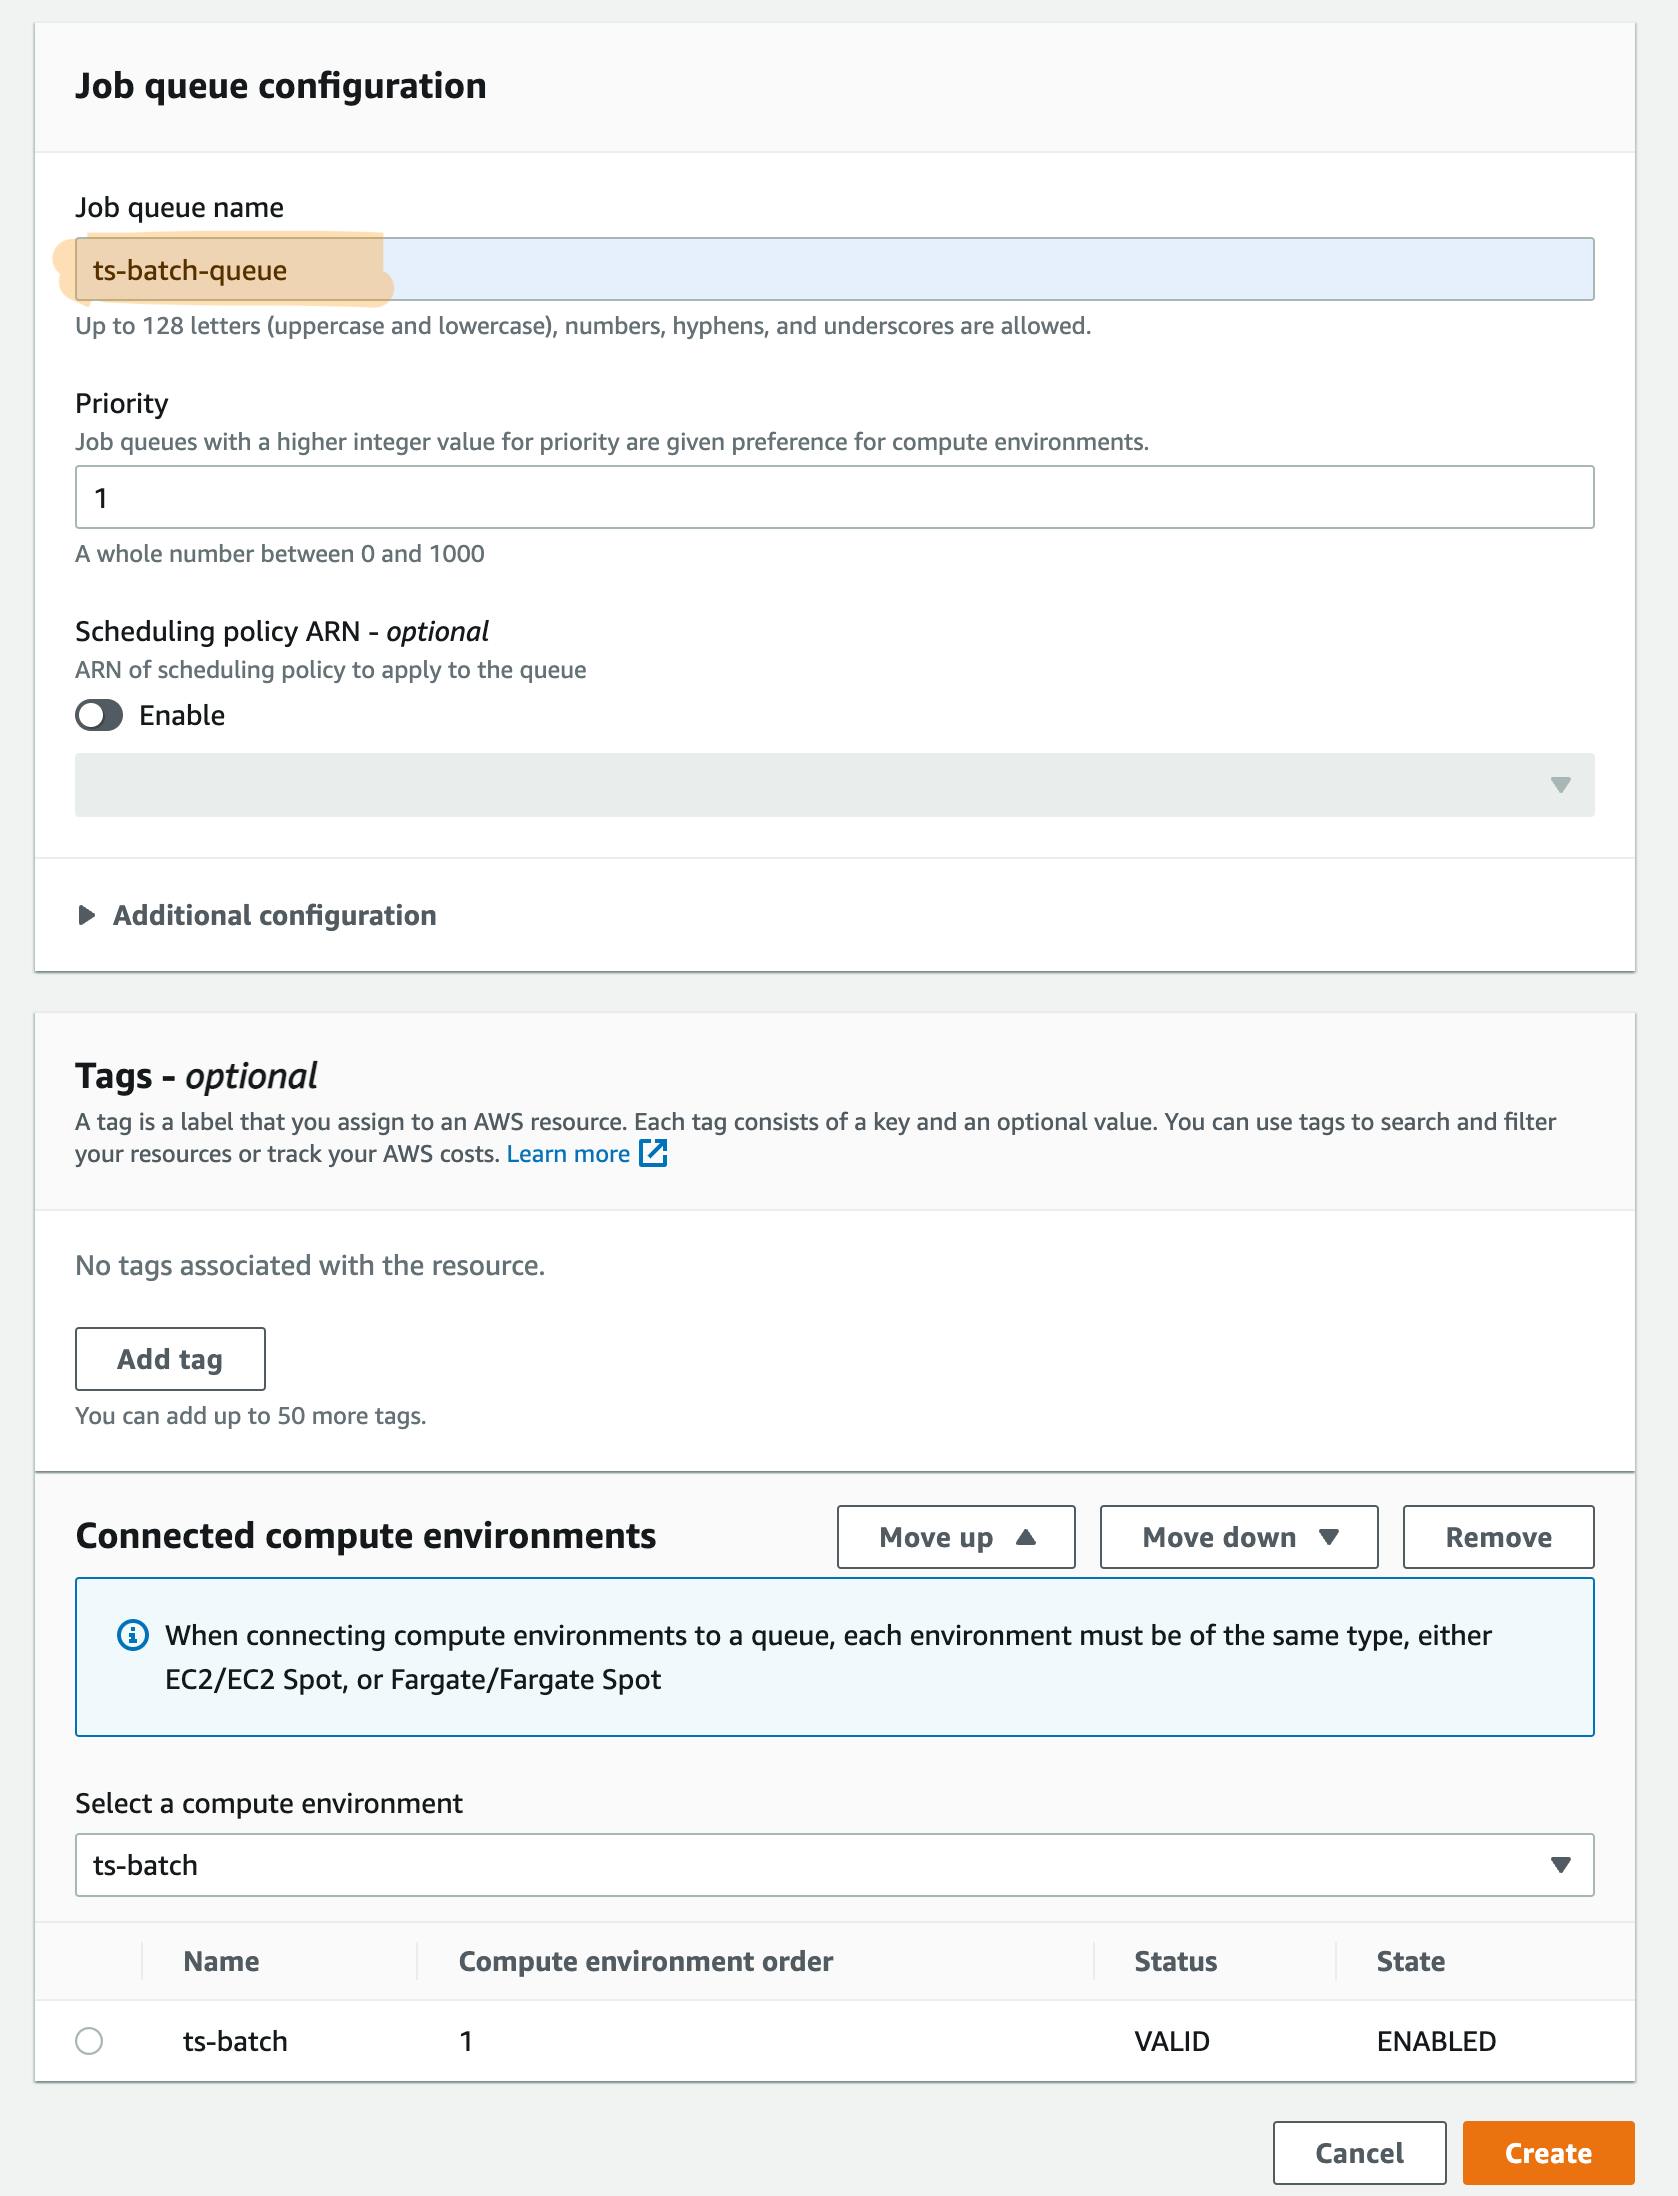
Create a Job Queue
After we see the Compute Environment created as 'Valid' and 'Enabled'. We can create our job queue.
Go to the job queue tab, and create one.
Just set the [Job queue name] as 'ts-batch-queue' and select the compute environment we created.
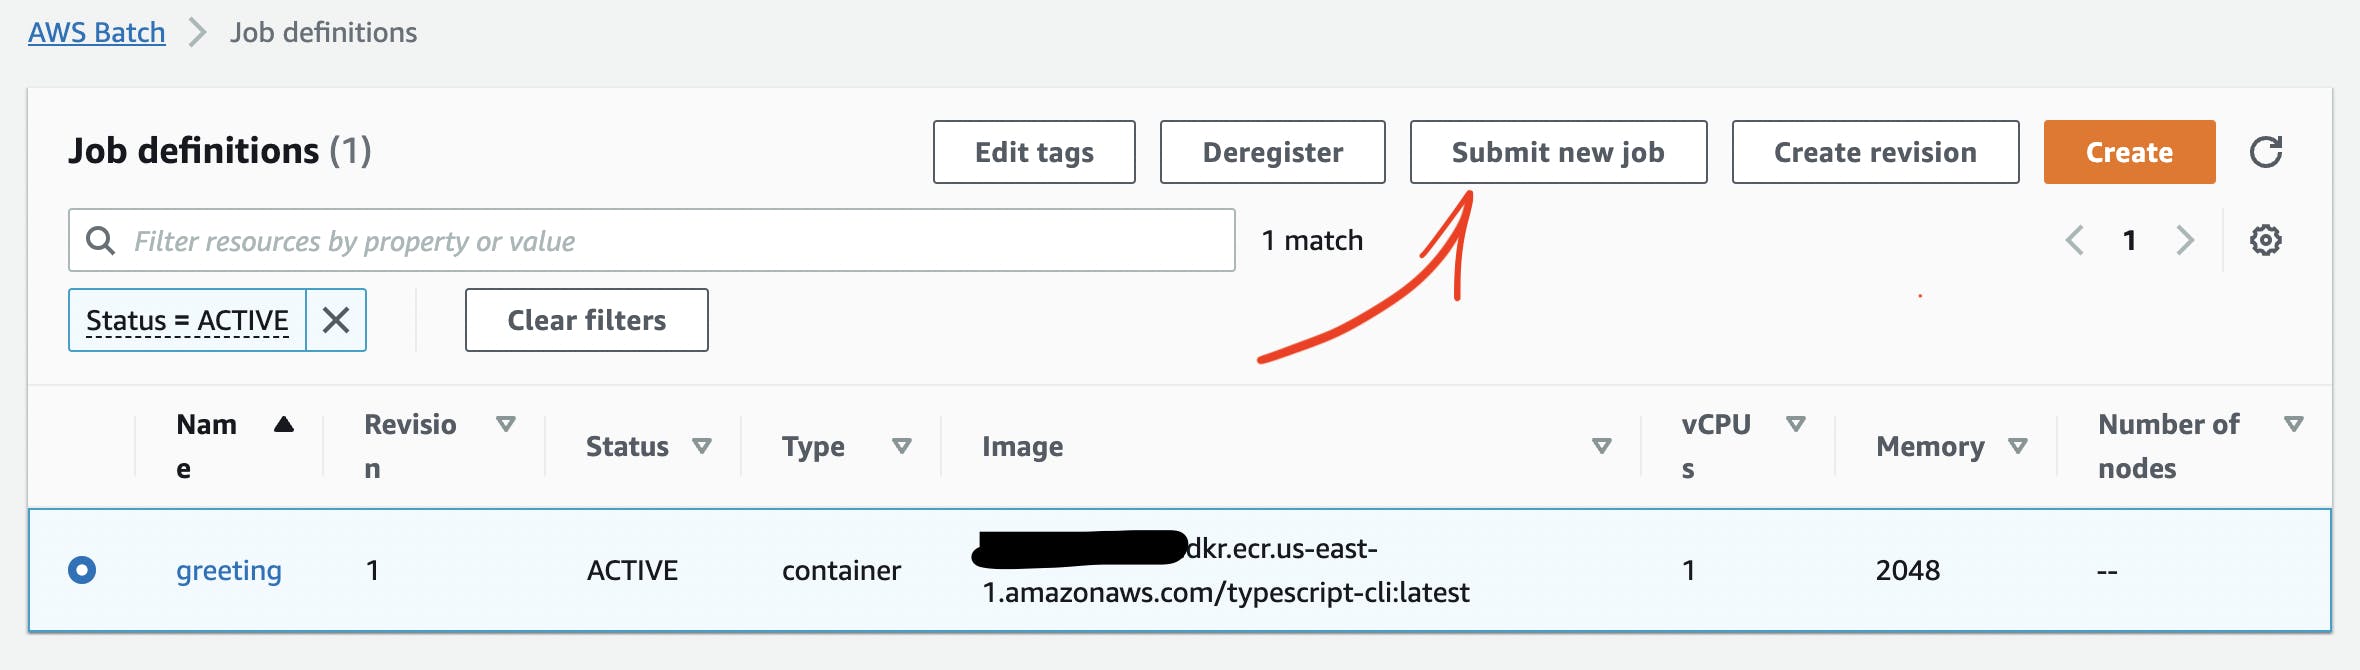
Create a Job Definition
Finally, we can create our job definition.
Here is how it looks like:
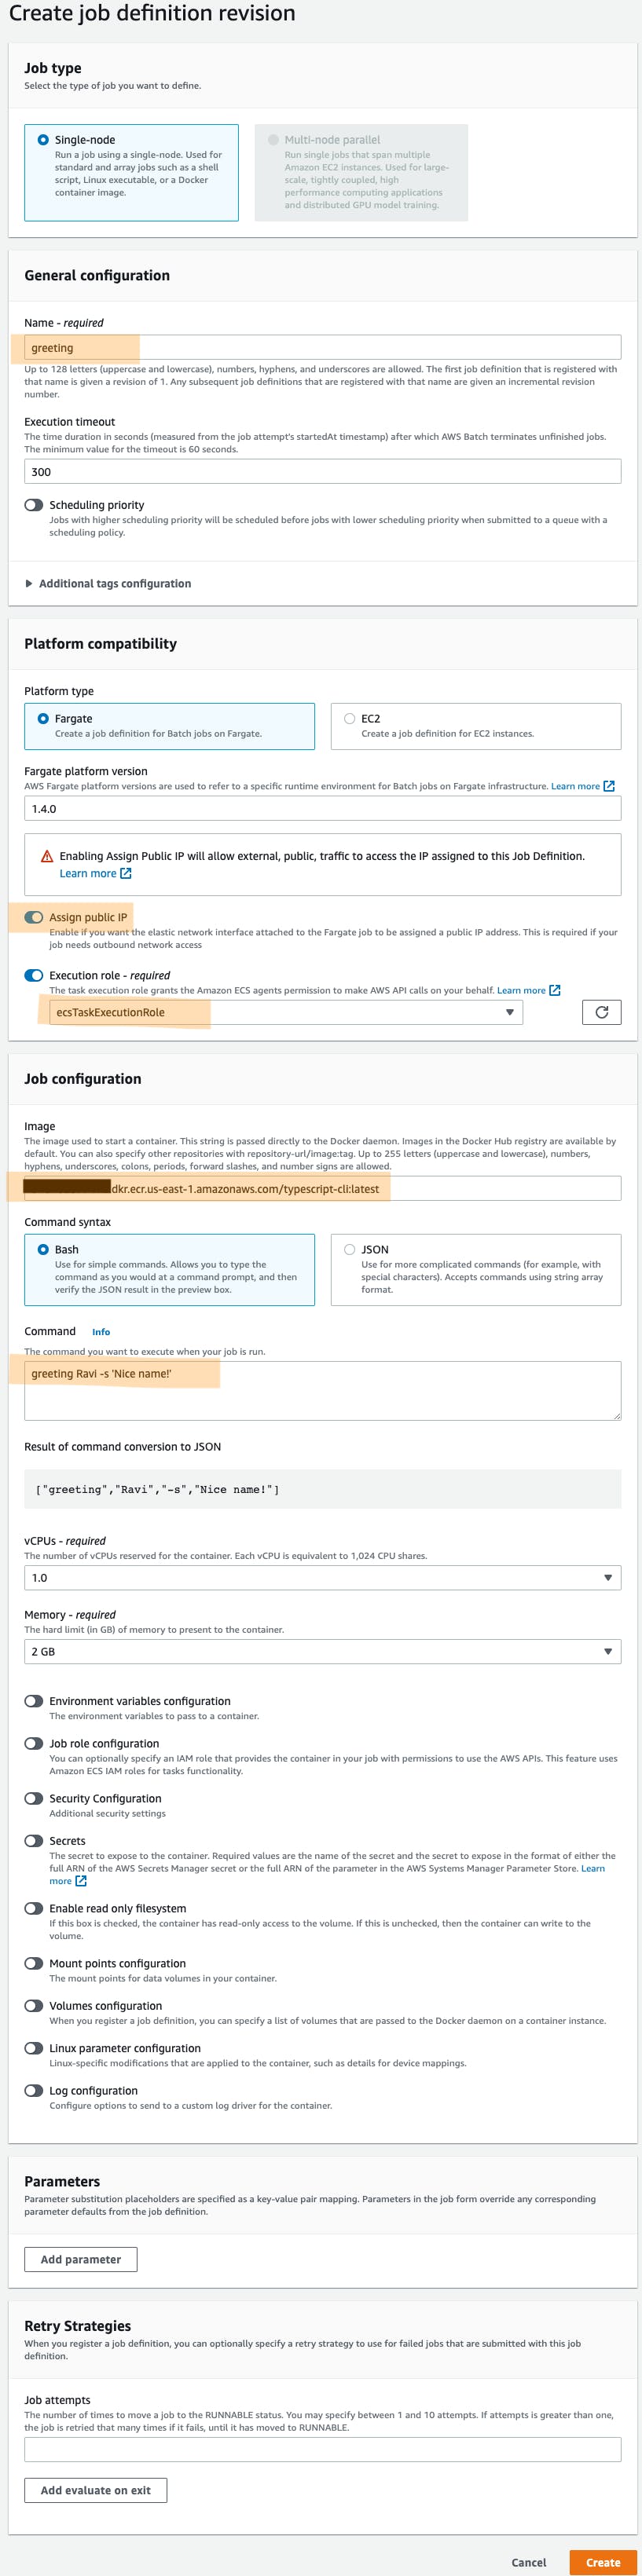
※ If your batch is running in a public subnet, you need to select the 'Assign public IP', otherwise it wont be able to access the internet and will fail trying to pull the ECR image. If it is on a private subnet with a route to a NAT Gateway on a public subnet, then you should uncheck the 'Assign public IP' since it will be able to access the internet through the NAT Gateway's IP.
Run the job
Now we can run our job.
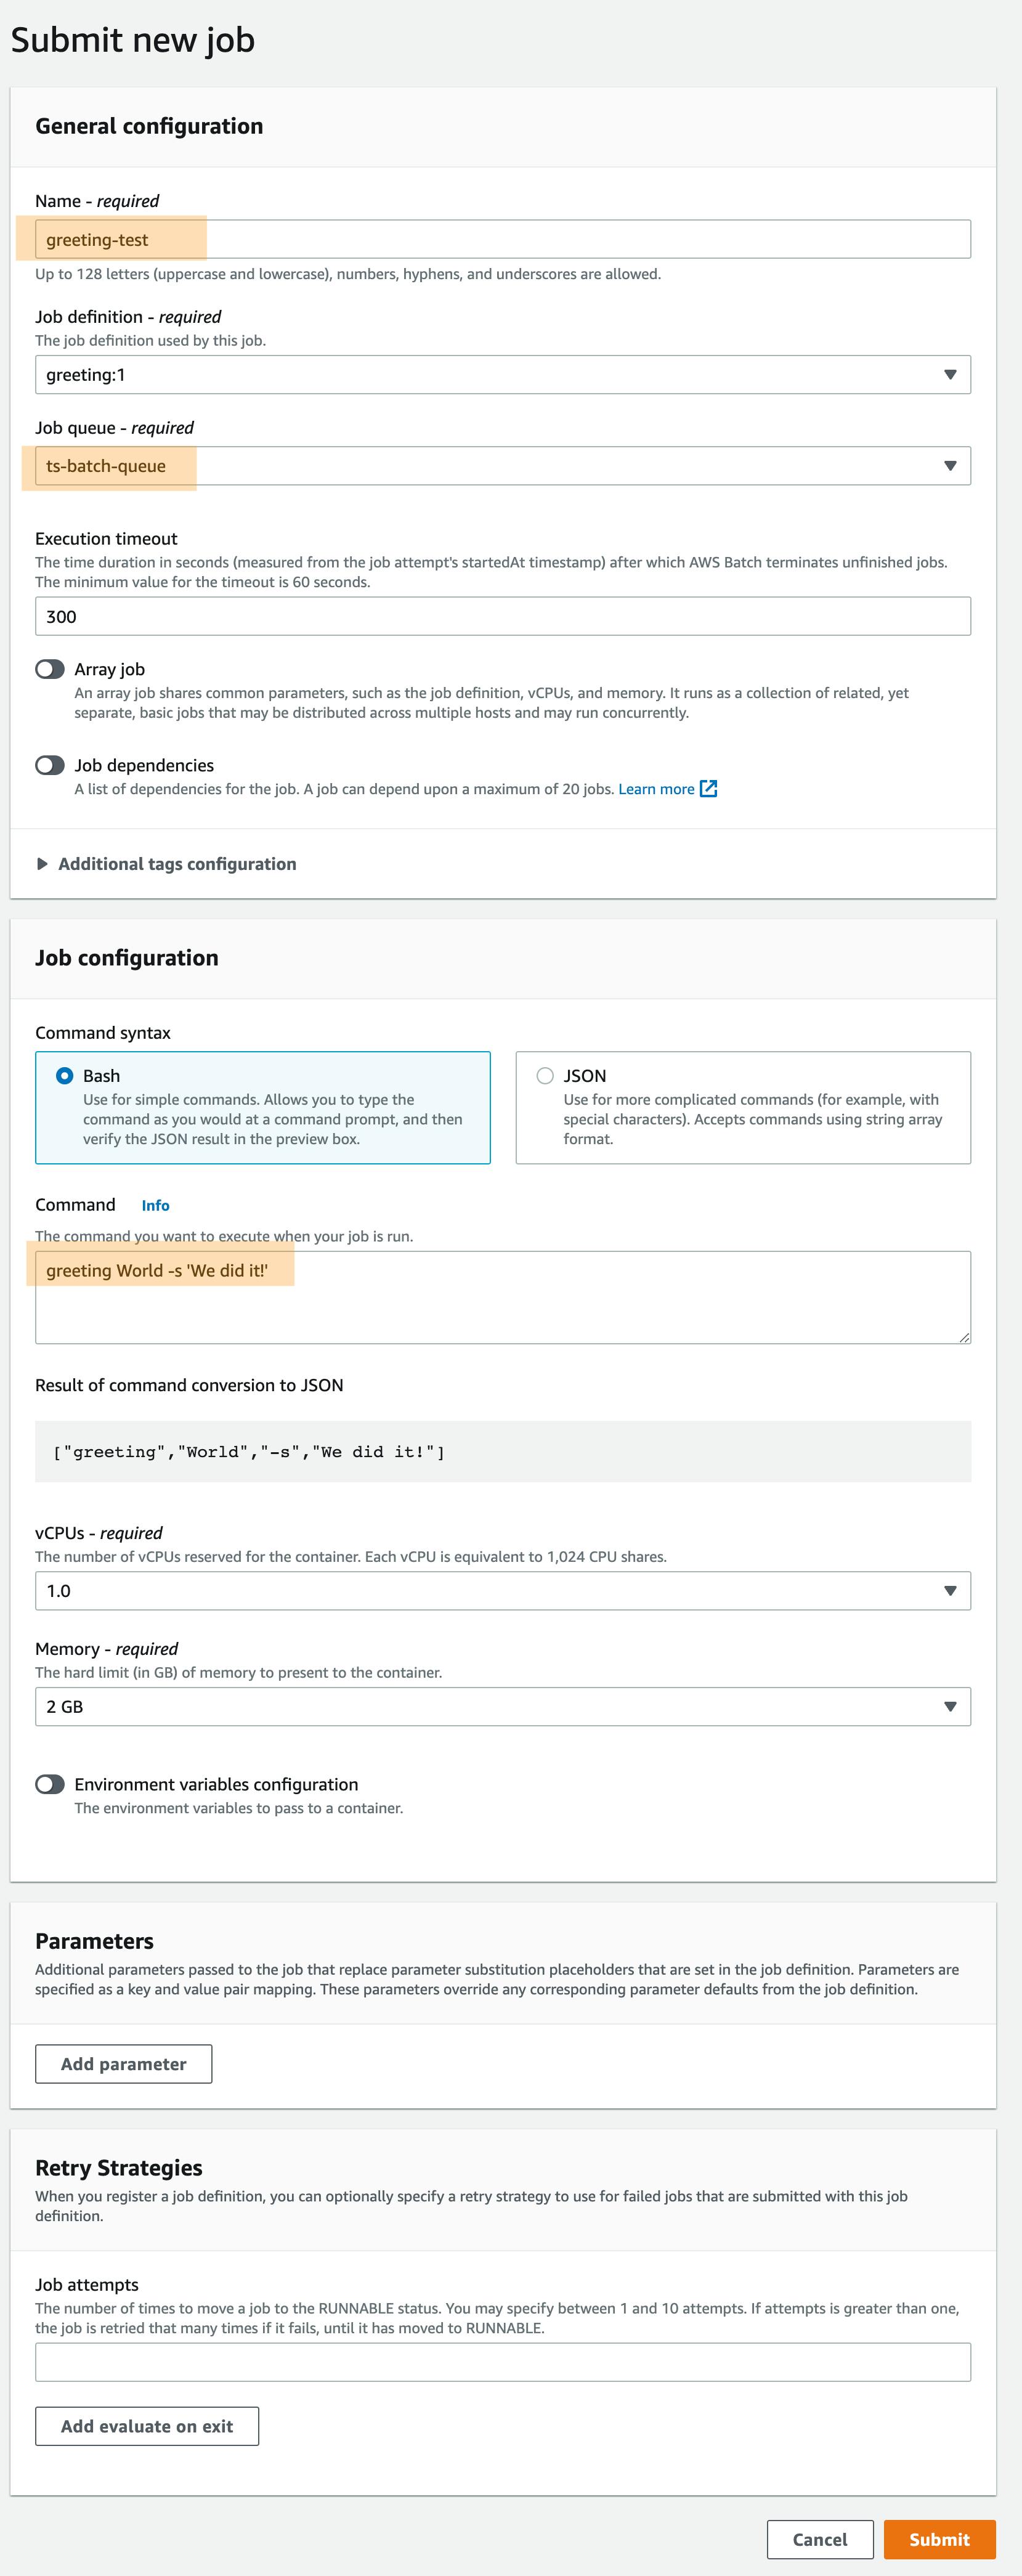
For that, in the Job Definition tab, select the job definition we've created and click on 'Submit new job'
Now we just need to choose a name for the job (this can be anything you like) and select the queue we've created. If we want, we can also change the default command and other values we have set in the job definition.
After that, we are able to check the running jobs on the 'Jobs' tab. (Click the refresh button if nothing shows up)
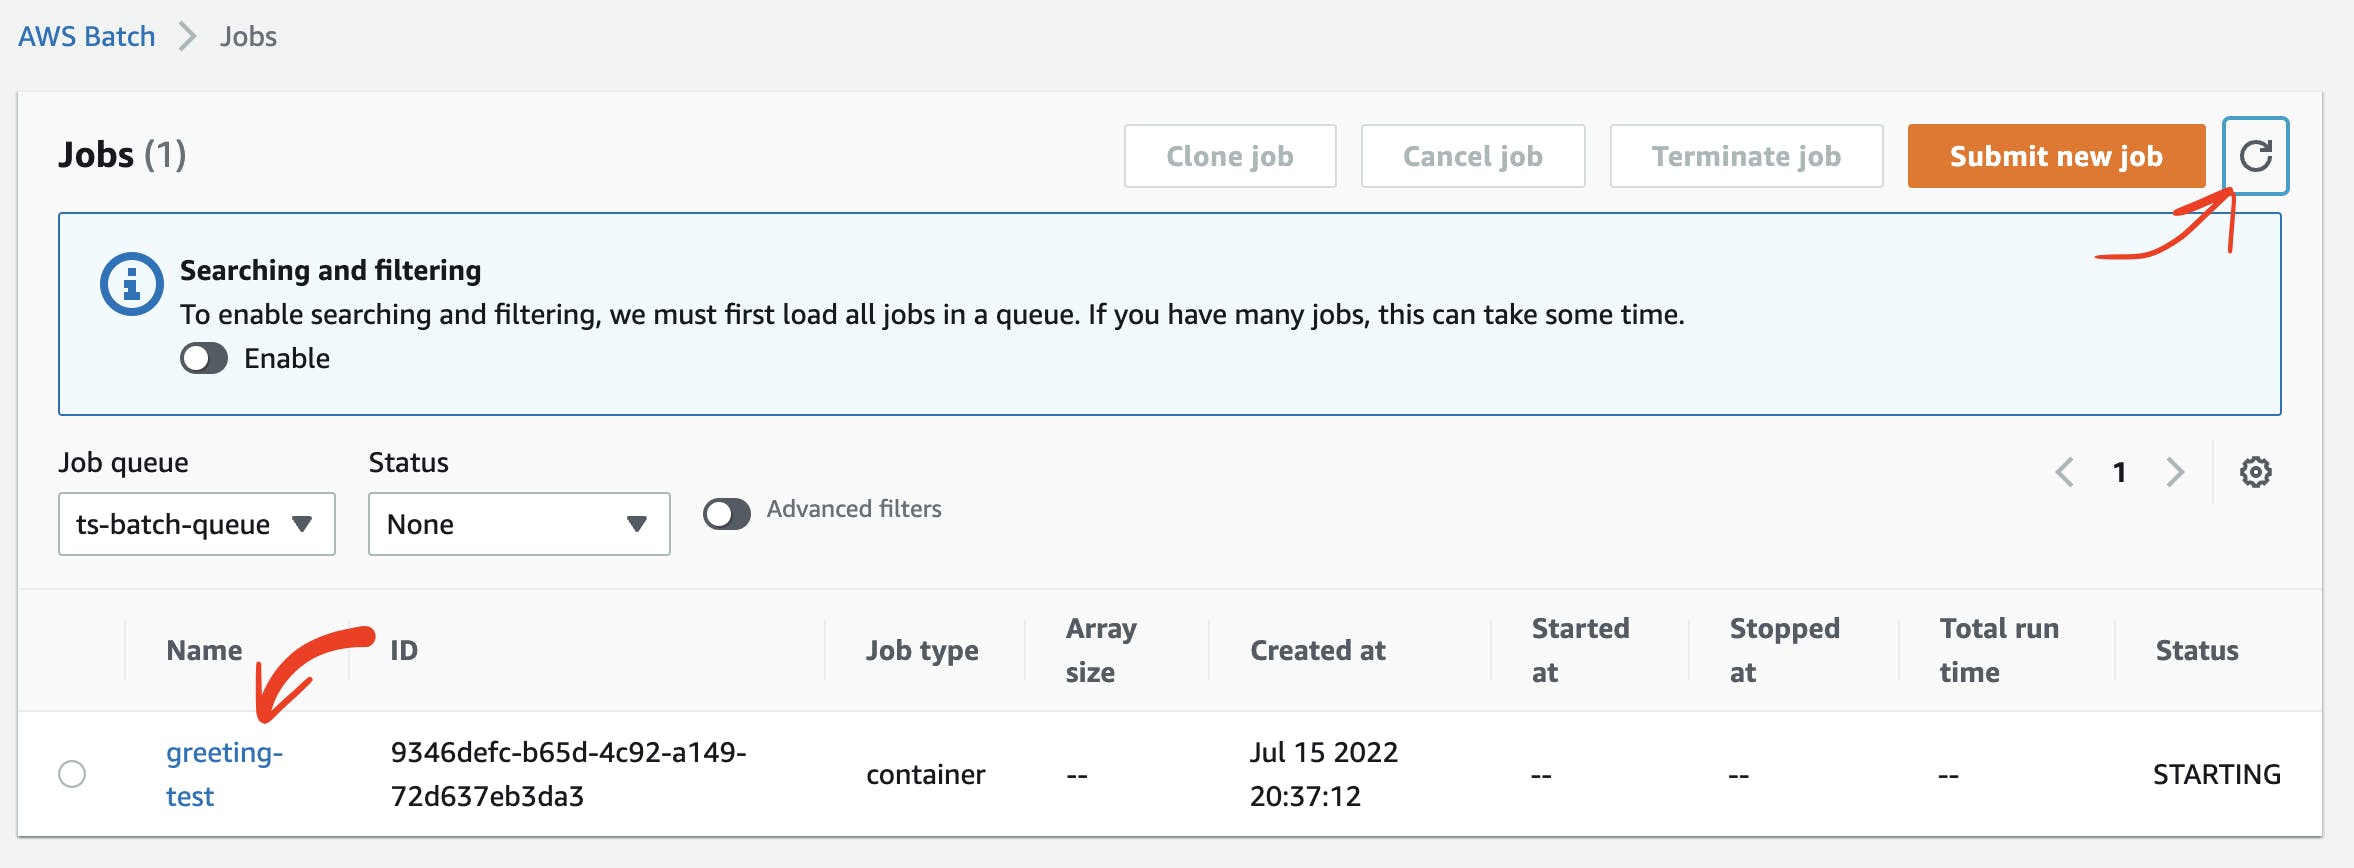
If we click on a job, we can see its details.
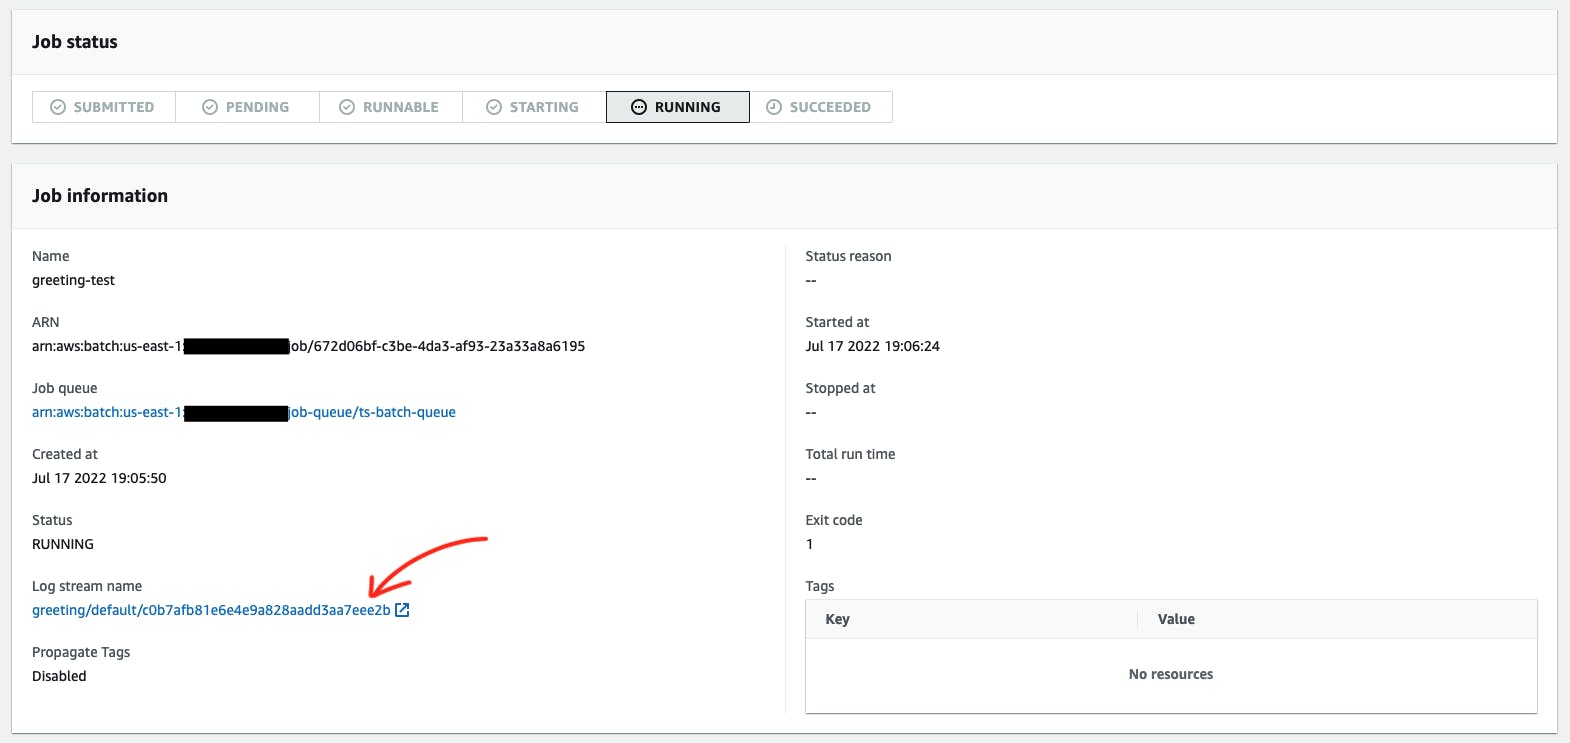
And also check the logs.

Conclusion
There are many other services that allows us to run batch jobs. and this is definitely not the easiest way to do it. But if you want to leverage the AWS ecosystem, then its definitely worth it.
The pricing is also nice, since you basically only pay for when your jobs are running.
To be honest, I wish that the 'Commander' package was more typesafe. So I'll keep looking for a better package to do it. But from what I saw, 'Commander' is the most used package for building a TypeScript CLI.
Next Steps
AWS CDK (IaC)
- Doing everything from the console is good when you are doing it for the first time, so you can understand better how everything fits together, but for more serious projects I would consider using a tool to write all the infrastructure as code, and to be able to deploy it all with a simple command. My recommendation for that is AWS CDK. Although there are other options as well. (e.g. Terraform)
Schedule with Event Bridge
- We submitted the job manually, but we can trigger it in a bunch of different ways. One way that is very common is using Event Bridge to schedule the batch job. So that it runs on a recurring schedule that you can configure.
Choose a faster language
- When I can, I usually default to TypeScript. But I recognize the it might not be the best language for every project. If you need to do data manipulation, you might want to choose Python. Or if you just want to do general things, but need more performance you can choose Go or Rust. And there are many other choices out there.
Thanks for reading!
👋 Let's connect!